1. Program architecture and flow
rsudp is laid out in a way that is standard for many continuous monitoring softwares, but which may be unfamiliar to some developers.
The program’s organization relies on two hierarchies: thread hierarchy and
data hierarchy. This allows the program to distribute data and messages
between different modules efficiently while maintaining programmatic
integrity required by rsudp’s dependencies (matplotlib.pyplot
objects, for example, can only be owned by the master thread).
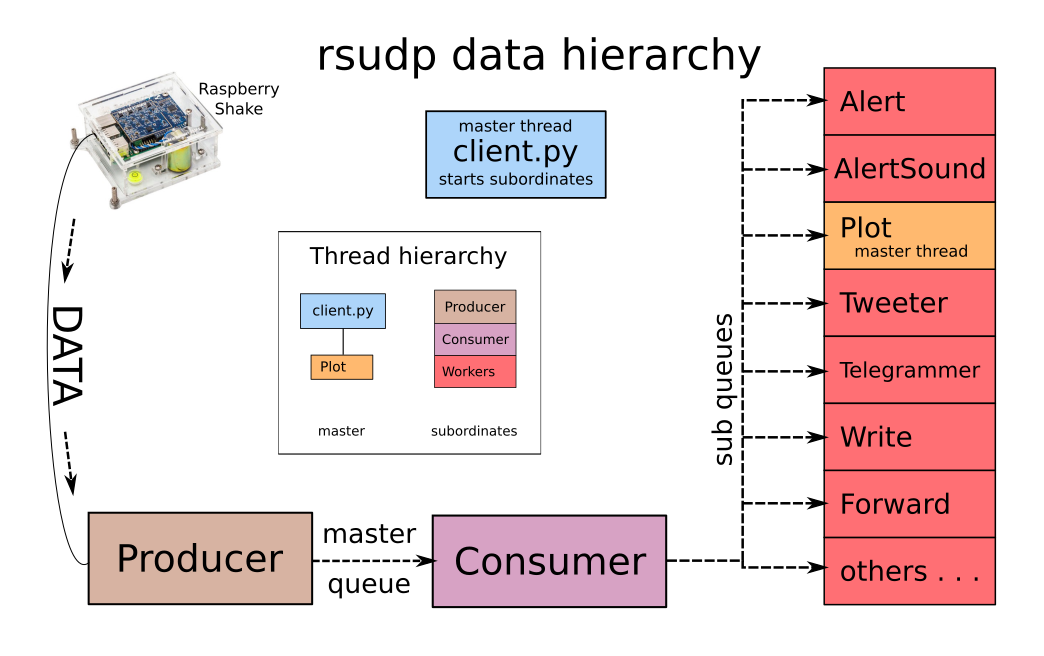
Data and (inset) thread hierarchies for rsudp. This figure shows a flow chart of data as it makes its way through rsudp’s producer-consumer architecture, and eventually to the end-consumer processing the data. Thread hierarchies are shown in the inset chart. If you are looking to add a module to rsudp, it will be a worker class (red) and will receive data from the master consumer like the rest of the workers.
1.1. Thread layout
The program relies on the threading and queue modules
to spin up multiple threads which all receive and work with data
independently of one another.
First, the rsudp.client (the “main” or “parent” thread) gathers
and parses settings. The client then instantiates the relevant
threading.Thread objects and passes settings and queues to
them. Next, it starts each of these consumer threads as “child” threads,
then finally the producer, also as a child thread.
If the rsudp.c_plot.Plot thread is enabled, the program will
start that last, since plotting must be run as a loop controlled by the
main thread (rsudp.client) which can only be done once it has
started all of its child threads.
1.2. Producer-consumer message passing
Data is read off the port by the data producer
(rsudp.p_producer.Producer) and passed directly to the
(rsudp.c_consumer.Consumer) via a first-in first-out (FIFO)
queue object.
This master consumer then duplicates these messages and
passes them to each sub-consumer queue destination in a list. At the
other end of each of these queues is a sub-consumer module, denoted
with a c_ before its module name.
Sub-consumers read messages from their queues and process data in
their logic loops. Some build obspy.core.stream.Stream with
the data passed to them, while some ignore the data and watch for
status messages.
1.2.1. Message types
Added in version 0.4.3: the RESET message type was added.
Currently, the message types are as follows.
Message |
Format example |
|---|---|
data |
|
ALARM |
|
RESET |
|
IMGPATH |
|
TERM |
|
Note
The above message formats are Python bytes objects, not traditional strings. The difference between a bytes object and a string is outlined briefly here.
ALARM messages are sent by rsudp.p_producer.Producer
when it sees the rsudp.c_consumer.Alert.alarm flag set to
True. This can trigger all sorts of actions. For example, when the
rsudp.c_alertsound.AlertSound module is enabled and sees
this message, it uses ffmpeg or libav to play a sound. The social media
classes rsudp.c_tweet.Tweeter and
rsudp.c_telegram.Telegrammer both use this message to
instantly broadcast to their respective platforms.
RESET messages are sent by rsudp.p_producer.Producer
when it sees the rsudp.c_consumer.Alert.alarm flag set to
True. Similar to ALARM messages, consumers can be programmed for
an essentially infinite number of things upon seeing this message.
IMGPATH messages are placed on the master queue by the
rsudp.c_plot.Plot.savefig() function, if and when a screenshot
figure is saved to disk. This is currently only used by the social media
modules, rsudp.c_tweet.Tweeter and
rsudp.c_telegram.Telegrammer which then send the saved image
to their respective social media platforms’ APIs for broadcast.
TERM messages are the universal signal for rsudp to quit. They generally start at the Producer and are passed through the data hierarchy as normal data would.
1.3. Adding your own consumer modules
Adding consumer modules is easy in theory, when you understand the workings of rsudp’s layout. Using the existing modules’ code architecture is likely useful and should be encouraged, so feel free to follow along with what we have already laid out in the code base.
There are three main things that need to happen in order to add a consumer.
Create a new module, named
c_mymodule.py, in thersudpdirectory.Add a section to your settings file which will tell rsudp what settings to pass to your module.
Add code to
rsudp.client.run()to pass settings and a queue to your module, and start it.
And some optional things to do in case you plan on submitting a pull request:
Add documentation in the form of reStructuredText-formatted docstrings (see examples below)
Add testing capability to your module.
1.3.1. Sample consumer
Below is a sample consumer construction to modify for your own purposes.
It receives all queue messages (outlined in Producer-consumer message passing)
and can be made to do pretty much whatever you wish,
until it receives a TERM queue message.
This consumer is created from a
rsudp.raspberryshake.ConsumerThread object,
which in turn modifies the threading.Thread class.
import sys
from rsudp.raspberryshake import ConsumerThread
from rsudp import printM

class MyModule(ConsumerThread): # this means MyModule will be based on the ConsumerThread class
    '''
    Documentation of your new module class goes here.
    Below is the format of two types of *param* string, which tell the
    documentation parser to inform users that this object needs the user to
    pass it a queue in order to work correctly.

    The first string, for the ``q`` parameter, has the type as the
    middle object and the caption after. The second one, ``thing1``
    could either be a string or a boolean value,
    so we move the type for it to its own row with the types listed after.
    Sphinx, the documentation formatter, will be able to combine these into
    one object describing the parameter.

    :param queue.Queue q: queue of data and messages sent by :class:`rsudp.c_consumer.Consumer`
    :param thing1: a passed parameter that's either a string or a boolean (True/False)
    :type thing1: bool or str
    '''
    def __init__(self, q, thing1    # ... probably some more parameters to pass to the class
                )
        super().__init__()
        self.sender = 'MyModule'
        self.alive = True
        self.queue = q
        self.thing1 = thing1
        # ... lots of other stuff to initialize your module
        printM(self.thing1, sender=self.sender)

    def getq(self):
        '''
        Reads data from the queue and returns the queue object.

        Since this function returns something, it has return
        strings (*rtype* stands for return type) so that the
        user reading the documentation knows what they'll get
        back if they call it.

        :rtype: bytes
        :return: The queue object.
        '''
        d = self.queue.get()
        self.queue.task_done()
        return d

    def run(self):
        '''
        Documenting how my cool module runs!

        Right now, its only function is to get and read queue messages
        to see if one of them has the ``TERM`` message in it,
        at which point it quits.
        '''
        printM('Starting.', sender=self.sender)
        # some stuff to execute here at runtime before looping

        while self.alive:
            # main loop, do something until self.alive == False
            d = self.getq()
            if 'TERM' in str(d):
                self.alive = False

        # now exit
        printM('Exiting.', sender=self.sender)
        sys.exit()
1.3.2. Adding your module to the settings file
An example settings section is given here. As a reminder, each settings section except the last one is required to have a comma after its closing brace to conform to JSON standards. Here let’s assume this is not the last JSON section, so we include the comma:
"mymodule": {
    "enabled": true,
    "thing1": "first thing"},
1.3.3. Adding your module to client.py
Since all modules are started from the client’s rsudp.client.run()
function, you will need to add a section of code to the client to tell it
how to start your module.
An example based on the JSON section above is given here.
from c_mymodule import MyModule

# ... lots of other stuff in client.py

def run(settings, debug):

    # ... setting up other modules

    if settings['mymodule']['enabled']:
        # first, gather settings
        thing1 = settings['mymodule']['thing1']
        # then, set up queue
        q = mk_q()
        # then, start a MyModule instance with the settings you got earlier
        mymod = MyModule(q=q, thing1=thing1)
        # now, pass this instance to the process list to be started below
        mk_p(mymod)

    # ...

    # this part already exists, but just to show you where in sequence your code should be:
    start()

    # ...
1.3.4. Testing your module
Formal testing of new modules is easy in rsudp.
The rsudp.client.test() function is set to run any enabled
module by default. If the module is not enabled in the default
settings, you can add a line to the
rsudp.test.make_test_settings() that specifies
settings['your_module']['enabled'] = True
The second step is to add your test to the dictionary of tests in
rsudp.test, so that it gets reported. For example:
TEST = {
        # other tests
        # ...
        'c_mytest':             ['something I am testing for  ', False],
        'c_anotherone':         ['some other thing I test     ', False],
}
Each dictionary item is constructed as a two-item list, where the first item is the description string, and the second is the status of the test (False is failure and True is passing).
Then, in your module, you can import the test dictionary and modify the status of your tests like so:
from rsudp.raspberryshake import ConsumerThread
from rsudp.test import TEST

class MyModule(ConsumerThread):
    def __init__(self, q    # ...
                )
        super().__init__()
        # ... stuff to initialize your module
        if abc:
            # this test occurs during initialization
            TEST['c_mytest'][1] = True

    def run(self):
        # some stuff here also
        if xyz:
            # this test is done at runtime
            TEST['c_anotherone'][1] = True
        while self.alive:
            # main loop, do something until self.alive == False
            # or you receive the TERM message
        # now exit
        printM('Exiting.', self.sender)
        sys.exit()
1.4. Suggesting features
As with other issues, if you have an idea for a feature addition but have questions about how to implement it, we encourage you to post to our forums at https://community.raspberryshake.org.
Thanks for supporting open source!