7. Testing and demoing rsudp
rsudp includes a small piece of software meant to test the ability to function and process seismic data. This could be useful if you are looking to demonstrate rsudp’s functionality to someone, perhaps a classroom of students, or if you need to test the core functionality like alerts and sounds.
Testing can also be useful for discovering whether or not a specific piece of data will trigger the alarm using settings from a custom settings file. For instructions on how to do that, see Settings during testing and Using your own data below.
Note
The testing functions are useful for figuring out local problems. That is, the testing capabilities of rsudp are meant to discover whether or not the software can feed data to itself and process it.
If you can run this testing program without any problems but you are having issues getting the software to see data from your own Raspberry Shake or boom, see the Troubleshooting rsudp page.
7.1. Using the testing functionality
The testing modules of this software are designed to read a small data file from disk and send its contents to the test port one line at a time. The program functions essentially as it would if it were receiving remote data, but instead it is feeding data to itself.
This means that you can demo the software even if you don’t have a Raspberry Shake, or even use the testing functionality to check whether or not an arbitrary piece of archival Raspberry Shake data will trigger an alarm in the software.
To run this software, make sure you have installed this software using the instructions in Installing rsudp, and that you can enter your conda environment (see Running in demonstration/testing mode).
Once you have done that, the test command rs-test will become
available.
Type rs-test to watch earthquake detection in
action. The test will last about 120 seconds, over which time
various bits of functionality will be tested, including ports,
directory permissions, internet, processing routines,
alert functionality, sound-playing capability, and more.
It does test whether it can see the internet at large, and whether it can send data to its own port (we’ve chosen 18888 as a test port). However, it does not test the ability to receive data from a remote shake. If you are having trouble with that, please see the Troubleshooting rsudp page.
7.2. Settings during testing
Default settings are slightly different during testing than they would
ordinarily be. Find a summary of what gets changed at
rsudp.test.make_test_settings().
To specify a settings file to use, use the -s flag. This is the same
as it would be if you were telling the rs-client to start with a
specific settings file. Usage looks like this:
rs-test -s custom_settings.json
Note
If you need to dump and edit a custom settings file to test with, you can use the client’s settings dump:
rs-client -d custom_settings.json
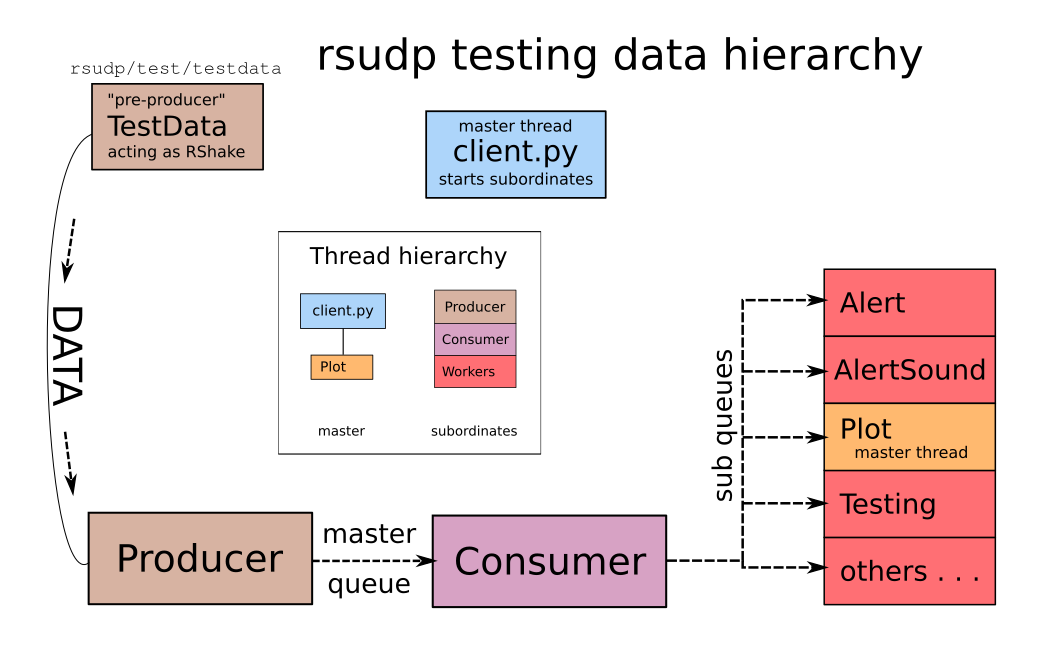
7.3. Data flow during testing
During testing, the typical data flow as depicted in
Program architecture and flow must be created artificially.
So, instead of getting data from the Raspberry Shake as usual,
the rsudp.t_testdata.TestData thread reads a file and
sends the individual lines in that file to the data port.
The Producer then reads that data and data flow through the rest
of the architecture continues as normal.

Flow chart of test data hierarchy,
based on the Program architecture and flow diagram, showing how data
makes its way through the program during testing.
Note that there is no Raspberry Shake in the hierarchy
as there would be in ordinary operation, but instead
data is generated from a text file at
rsudp/test/testdata.
7.4. Testing your own modules
Read about adding testing capabilities to new modules in Testing your module.
7.5. Using your own data
Included in this software is a function that will convert small seismic data files (basically anything that obspy can read that was recorded at the same sample rate as the Raspberry Shake) to the UDP packet format required by rsudp.
This function is documented at rsudp.packetize.packetize()
and it is integrated into the testing script. You can tell the testing
script to convert and use a miniSEED file on disk by doing the following:
rs-test -f test.mseed
This will create a text file named test.mseed.txt in the same directory
which will be used to feed data to the producer during testing.